
해당 포스팅은 Stuart Butler , Tom Oliver의 Game Development Patterns with Unreal Engine 5를 바탕으로 작성한 내용입니다.
커맨드 패턴이란?
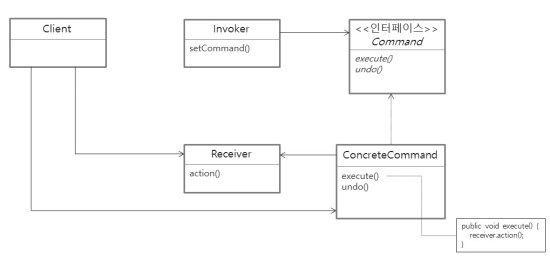
커맨드 패턴(Command Pattern)은 요청(행동)을 객체로 캡슐화하여 호출자와 실행자를 분리하는 디자인 패턴이다.
핵심은 “무엇을 할지”를 객체로 만들어두고, “언제 실행할지”는 다른 객체가 결정하도록 하는 것이다.
즉,
입력 → 커맨드 → 실행 대상
으로 흐름이 나뉘게 된다.
커맨드 패턴 예시
커맨드 패턴을 쓰지 않은 경우
cpp
void AMyPlayerController::SetupInputComponent()
{
    InputComponent->BindAction("Attack", IE_Pressed, this, &AMyPlayerController::Attack);
}

void AMyPlayerController::Attack()
{
    // 입력 함수 안에서 구체적인 로직이 실행됨
    MyCharacter->PlayAttackAnimation();
    MyCharacter->SpawnProjectile();
}
커맨드 패턴(Command Pattern) 적용
1. 커맨드 인터페이스 정의 (UInterface)
cpp
// CommandInterface.h
#pragma once

#include "CoreMinimal.h"
#include "UObject/Interface.h"
#include "CommandInterface.generated.h"

UINTERFACE(MinimalAPI)
class UCommand : public UInterface { GENERATED_BODY() };

class ICommand
{
    GENERATED_BODY()

public:
    // 명령 실행 (대상: 캐릭터)
    virtual void Execute(class AMyCharacter* Target) = 0;

    // 필요 시 실행 취소 로직 추가 가능
    virtual void Undo(class AMyCharacter* Target) {}
};
구체적인 커맨드 구현 (Smart Pointers)
cpp
// AttackCommand.h
#include "CommandInterface.h"
#include "MyCharacter.h"

class FAttackCommand : public ICommand
{
public:
    virtual void Execute(AMyCharacter* Target) override
    {
        if (Target)
        {
            Target->Attack();
        }
    }
};

// MoveCommand.h (데이터를 포함하는 커맨드)
class FMoveCommand : public ICommand
{
public:
    FMoveCommand(const FVector& InDirection) : Direction(InDirection) {}

    virtual void Execute(AMyCharacter* Target) override
    {
        if (Target)
        {
            Target->Move(Direction);
        }
    }

private:
    FVector Direction;
};
3. Invoker 구현
cpp
// MyPlayerController.cpp

void AMyPlayerController::BeginPlay()
{
    Super::BeginPlay();

    // 1. 커맨드 객체 미리 생성 (캐싱)
    AttackCommand = MakeShared<FAttackCommand>();
}

void AMyPlayerController::SetupInputComponent()
{
    Super::SetupInputComponent();

    // 향상된 입력 시스템(Enhanced Input) 등과 연동
    InputComponent->BindAction("Attack", IE_Pressed, this, &AMyPlayerController::OnAttackInput);
}

void AMyPlayerController::OnAttackInput()
{
    // 2. 캐싱된 커맨드 실행
    if (AttackCommand.IsValid() && MyCharacter)
    {
        AttackCommand->Execute(MyCharacter);

        // 3. (선택사항) 히스토리에 저장하여 리플레이나 Undo에 활용
        CommandHistory.Add(AttackCommand);
    }
}